Invisible Join Crochet
Invisible Join Crochet - Web using the invisible join technique is an easy way to make your finished crochet projects look more professional. An invisible join or a seamless join is a great finishing touch to your crochet project. Web invisible join in crochet. Especially when combined with standing stitches, this method makes your crochet next level! Finish the last round as usual. With this simple technique, all of your projects will look seamless. This technique is perfect for any project that requires joining at the end of the round, and is ideal for jogless stripes. Web what makes the crochet invisible stitch in the round so great, is that you don’t need to fasten off at the end of each round. Web learn how to crochet an invisible seamless join when working in the round in three easy steps! Do not join, instead pull the yarn right on through the last stitch. Finish those crochet projects like a professional! Insert the needle into both loops the first actual stitch of this round (not the chain). Web using the invisible join technique is an easy way to make your finished crochet projects look more professional. Web the invisible join method in crochet is a technique used to seamlessly end a round without leaving a noticeable gap or bump, instead of joining with a conventional slip stitch. Finish the last round as usual. This method creates a nearly invisible seam, giving your work a polished and professional look. Do not join, instead pull the yarn right on through the last stitch. With this simple technique, all of your projects will look seamless. Web invisible join in crochet. Use the invisible join technique for seamless fastening off. Say goodbye to seams and wonky edges. Finish the last round as usual. Use the invisible join technique for seamless fastening off. An invisible join or a seamless join is a great finishing touch to your crochet project. What makes the invisible join so much better is that it is invisible and with this technique, you will not be able. Especially when combined with standing stitches, this method makes your crochet next level! Use the invisible join technique for seamless fastening off. Finish the last round as usual. Insert the needle into both loops the first actual stitch of this round (not the chain). Web using the invisible join technique is an easy way to make your finished crochet projects. Say goodbye to seams and wonky edges. Do not join, instead pull the yarn right on through the last stitch. Web the invisible join method in crochet is a technique used to seamlessly end a round without leaving a noticeable gap or bump, instead of joining with a conventional slip stitch. Web crocheting in the round? This method creates a. See how to use this technique for seamless, jogless stripes here. Finish those crochet projects like a professional! Web invisible join in crochet. This method creates a nearly invisible seam, giving your work a polished and professional look. Especially when combined with standing stitches, this method makes your crochet next level! Web when crocheting in the round, the invisible join is a far better way to close your work than the classical slip stitch join. Web using the invisible join technique is an easy way to make your finished crochet projects look more professional. Say goodbye to seams and wonky edges. Web what makes the crochet invisible stitch in the round. This technique is perfect for any project that requires joining at the end of the round, and is ideal for jogless stripes. Web invisible join in crochet. Web when crocheting in the round, the invisible join is a far better way to close your work than the classical slip stitch join. Web the invisible join method in crochet is a. Web using the invisible join technique is an easy way to make your finished crochet projects look more professional. See how to use this technique for seamless, jogless stripes here. Especially when combined with standing stitches, this method makes your crochet next level! This technique is perfect for any project that requires joining at the end of the round, and. Web the invisible join method in crochet is a technique used to seamlessly end a round without leaving a noticeable gap or bump, instead of joining with a conventional slip stitch. Especially when combined with standing stitches, this method makes your crochet next level! Web using the invisible join technique is an easy way to make your finished crochet projects. Say goodbye to seams and wonky edges. Web crocheting in the round? Do not join, instead pull the yarn right on through the last stitch. Web when crocheting in the round, the invisible join is a far better way to close your work than the classical slip stitch join. Web learn two invisible join techniques to get rid of gaps. Finish those crochet projects like a professional! Web the invisible join method in crochet is a technique used to seamlessly end a round without leaving a noticeable gap or bump, instead of joining with a conventional slip stitch. Use the invisible join technique for seamless fastening off. Web using the invisible join technique is an easy way to make your. An invisible join or a seamless join is a great finishing touch to your crochet project. Web crocheting an invisible join is a technique that allows you to seamlessly connect the beginning and end of a round or row in your crochet project. This technique is perfect for any project that requires joining at the end of the round, and is ideal for jogless stripes. Web what makes the crochet invisible stitch in the round so great, is that you don’t need to fasten off at the end of each round. Finish those crochet projects like a professional! Insert the needle into both loops the first actual stitch of this round (not the chain). Web invisible join in crochet. Say goodbye to seams and wonky edges. Web using the invisible join technique is an easy way to make your finished crochet projects look more professional. Web crocheting in the round? Especially when combined with standing stitches, this method makes your crochet next level! Finish the last round as usual. Web learn two invisible join techniques to get rid of gaps when crocheting in the round. This method creates a nearly invisible seam, giving your work a polished and professional look. With this simple technique, all of your projects will look seamless. Do not join, instead pull the yarn right on through the last stitch.
Crochet Invisible Join Technique Blackstone Designs

HOW TO crochet an Invisible Join⎜Raven's Crochet

How to Make an Invisible Join in Crochet and Knitting
GO SEAMLESS!! Crochet Invisible Join The Easy Way Littlejohn's Yarn

How to Make an Invisible Join Single Crochet YouTube

Invisible Finish Crochet Tutorial The Loopy Lamb

TIP 5 Invisible join row (double crochet) nice look start stitch

How to crochet invisible join

How to Make an Invisible Join in Crochet (In the Round) Maisie and Ruth
Invisible Join Crochet Tutorial AllCrafts Free Crafts Update
Web When Crocheting In The Round, The Invisible Join Is A Far Better Way To Close Your Work Than The Classical Slip Stitch Join.
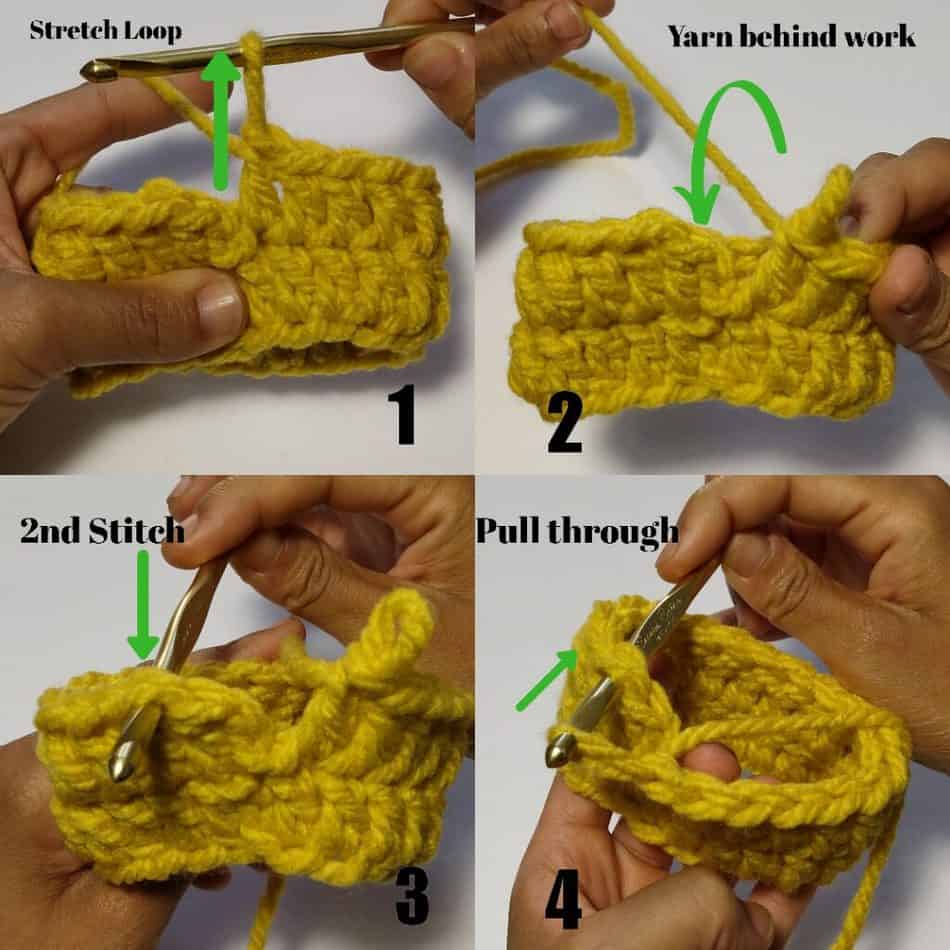
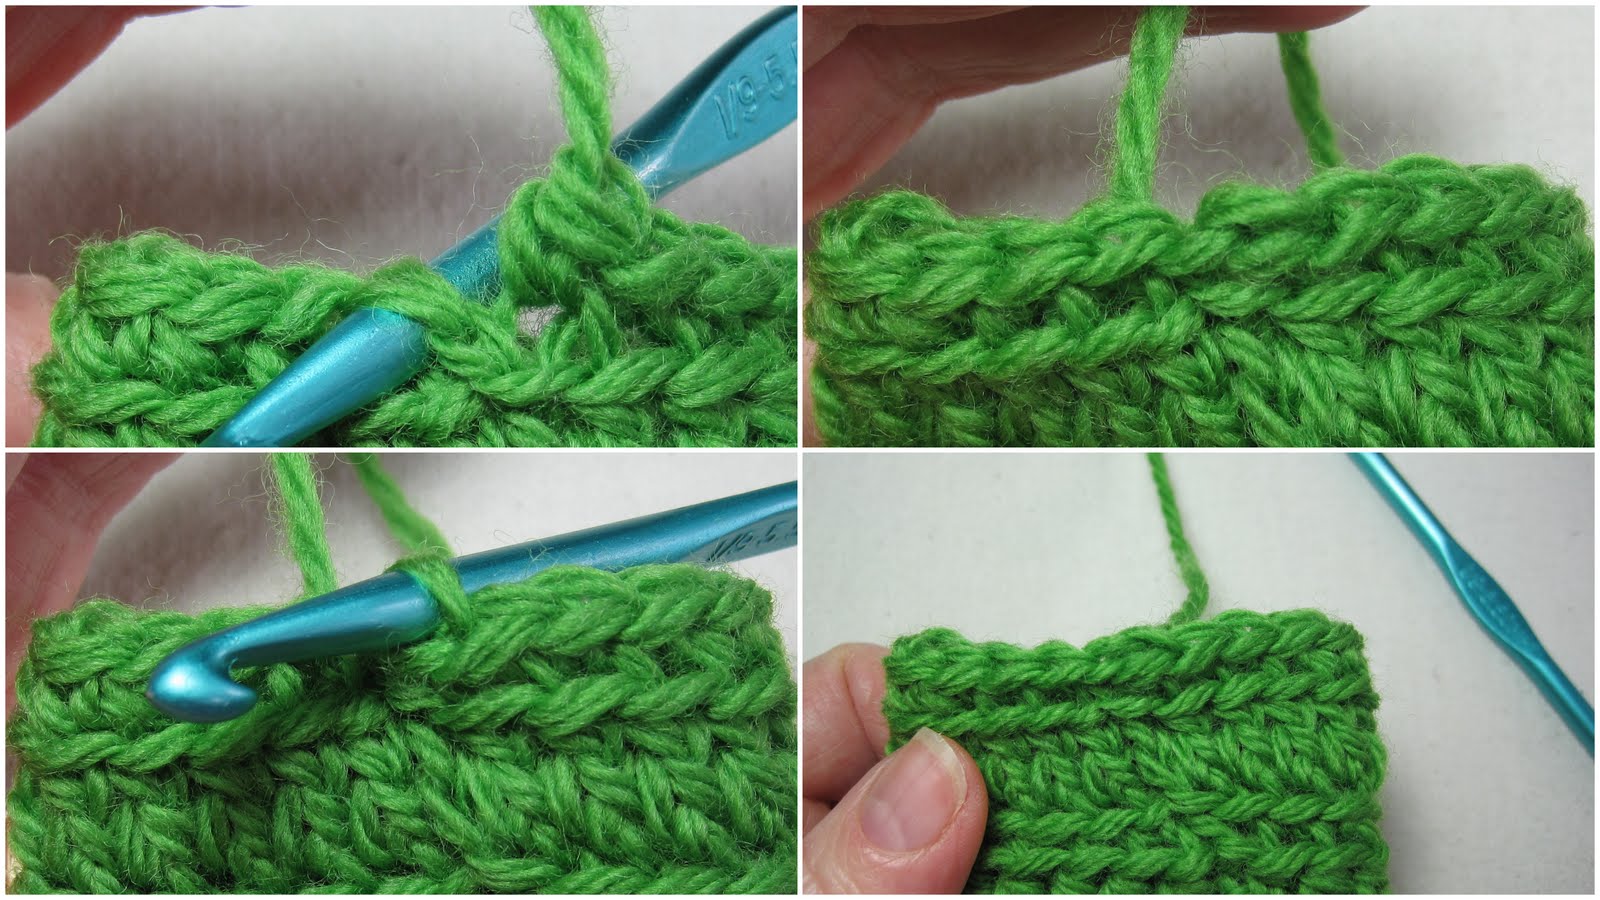
Web Learn How To Crochet An Invisible Seamless Join When Working In The Round In Three Easy Steps!
Web The Invisible Join Method In Crochet Is A Technique Used To Seamlessly End A Round Without Leaving A Noticeable Gap Or Bump, Instead Of Joining With A Conventional Slip Stitch.
What Makes The Invisible Join So Much Better Is That It Is Invisible And With This Technique, You Will Not Be Able To Tell Where Your Last Round Ended!
Related Post: